
Our First Year Growing Our own Willow
- Dec 10, 2025
- 5 min read
Updated: Feb 24
Ok, so it's a little under the first year since the #willow cuttings went into the ground but it feels like the right time to blog about our progress so far as we reach the end of the first season.
If you've followed our social media accounts (and if not, why not?!) you might have seen that back in march we set about planting over 300 willow cuttings in one of our tops fields. Let's back track... we've been on our own farm now for about two and a half years, but we decided not to do anything too drastic with the land for the first year or so, thinking that it was important to see the land through a whole year of weather, seasons and rotation of stock so we could see how it copes. The fields are living, breathing things, all reacting differently in different situations. Ours are quite rocky, with some draining better than others (don't worry, the field drains are on our to do list), so I set about researching what could be done with wet areas of ground. There's one spot that's too wet for Moose to graze on but safe for sheep to graze around in the summer... so, we decided on Willow! It had been on my radar for years, if you know us, you know we're both creative, land lovers with a mission to make our small farm as productive as possible, honouring it and the land, however not owning our own land before limited what we could do. Creating beautiful things, #baskets, #hurdles, decorative pieces, all from things we've #planted, nurtured and #harvested hits the spot perfectly.

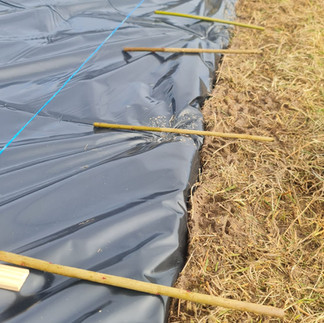
So, after picking the perfect spot, not too close to any boundary or drainage system due to the willow roots and not in any standing water but somewhere still quite wet. Ideally, it wants to be quite sheltered too, but we live on Ynys Môn so this isn't really a luxury we have! I then set about searching for a supplier of cuttings and doing as much research into growing as possible, I reached out to some growers and suppliers asking advice on the best varieties and put my order in! Now, there are a few places selling full starter kits for growing willow, which I had been tempted by. They tend to include the cuttings, a roll of weed membrane, pegs and a metal stake to make holes through the membrane and into the ground so you can easily insert the willow cuttings. However, I'd recommend not falling for the cheaper weed membrane. We actually used silage sheeting, much thicker and sturdier, also more expensive but worth it! What you don't want is grass and weeds strangling the cuttings in their first year or so growing (down the line when the cuttings have had a few seasons growing, we'll remove the sheeting anyway).
Once the cuttings had arrived in February, it was onto prepping the area. As I say, grass is a big pain in the a** when growing willow, so we measured and marked the two areas that were to become the willow beds and then mowed them, mowed them again and, you guessed it, went one more time for good luck! Top tip, mow slightly bigger than the bed itself so weeds don't grow back with a vengeance around the edges. After raking up the cut grass, we laid the silage sheeting, digging a trench around the edges and burying it by about a foot, giving it a decent chance against our coastal winds. We then pegged it down too, again, the plastic pegs are good, but metal grass staples with guards are, in our opinion, so much better.

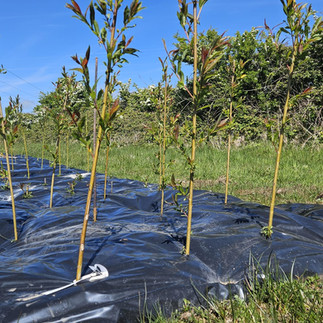
The willow arrived (we ordered 1ft cuttings but were sent some 3ft ones as well by mistake, we were kindly told to keep them so they've been planted too!) and our back's prepared themselves for a good few hours of planting! So, we've got a few different varieties of willow, some for basketry and some for more structural work. What you want to use your willow for and the variety will dictate how far apart you plant them. For the #basketry, 1ft apart will encourage the growth of longer straighter rods, reaching for the sun, 3ft apart for the structural willow, allowing for thicker growth. Planting willow is as simple as sticking it in the ground, so a few hours later this was done! How exciting!


It's important to weed around the willow often but especially in the initial stages, so we headed up regularly to check and do a little tidy. Now, a major growth issue for us was the neighbouring farmer liming his fields on one of the windiest days, causing the willow cuttings to get covered in lime, the majority of them were fine but some did suffer from a sort of lime burn which killed a handful off, it also probably stunted the main crops growth but hey ho, willow is an investment of time too so it'll get there over the next few seasons!


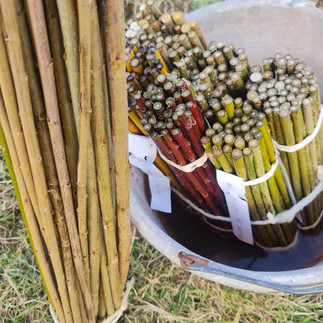
November came around quite quickly and as the leaves started to fall off the willow that had grown, our minds turned to harvesting. You should harvest willow in it's dormant season so it's best to wait until all the leaves have fallen off. You then coppice the willow back down, ready for it to grow back with more stems and stronger the next year. Because we're suckers for the back pain, we've #coppiced our right down but if you wanted to save your precious spines, you can leave them slightly taller, it's all dealers choice. As you're coppicing and harvesting, make sure to remove as many fallen leaves as possible from the base of the willow as this can lead to rotting. Once cut, it's time to grade and bundle the willow, we do this by separating down varieties and then sizes. Then, they're put in the back of the Land Rover and placed in the store room to dry out for the next six months or so. Then you just soak and mellow them for the correct amount of time (normally soaked for around a day per foot of willow length, but this also depends on variety and then mellowed, this means wrapping them in a damp towel for 24 hrs) before weaving to make them supple again. You can weave with green willow, but these items will shrink slightly as the willow dries, we tend to weave wreaths, big and small, with green willow as the shrinkage doesn't pose a problem for wreaths.

When I was harvesting, any cuttings that hadn't taken or had died off were removed and replaced with cuttings that I took from this years harvest, so it really is a beautiful, sustainable cycle, and a store room full of your own home grown willow, all stunning colours, is sooooooo rewarding! This year we've harvested Eugenii, Vitellina, Viminalis, Flanders Red and Purpurea, with the last lot getting chopped and graded this week! If any of the main trunks/stems are getting a bit bigger and thicker, it's wise to widen the hole in the membrane so they don't get chocked too.

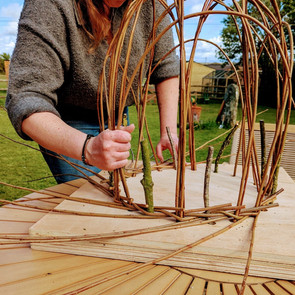


We're currently #weaving with some sustainably grown, bought in willow but give us a few months or so and we'll be incorporating our own home grown rods into our work! Some woven beauties are available in our online shop, have a browse. We're looking at selling some cuttings next year too, so if growing willow is something that might interest you, feel free to reach out, we've learnt a lot on this first year journey so are always here to help!

#lifestyle #lifestyleblog #consideredliving #seasonalliving #farm #farmblog #smallbusiness


Comments